출처 :http://www.onjava.com/pub/a/onjava/2007/07/10/gmf---beyond-the-wizards.html
GMF: Beyond the Wizards
byJeff Richley
07/11/2007
In today's development environment, users expect to be able to visualize data, configuration, and even the processes of a system. For this reason, they use tools to communicate requirements visually with stakeholders and subject matter experts. Think for a moment about UML, it takes a very complex set of data and represents it visually to simplify the communication of software requirements and design. Likewise, there are potential visual tools for describing workflows, data mining, server management, and many other business processes. These tools are able to boost productivity and reduce cost, which is obviously a win-win situation.
Historically, writing these tools has been very time consuming and reserved for those GUI gurus that are well above mere mortals. However, that barrier has been broken down for us by the folks working on the Eclipse Graphical Modeling Framework (GMF).
You may be wondering, "What is GMF and what can it do for me?" GMF is a framework that takes a set of configuration files (a domain model, a graphical definition, and a tool definition), puts them all in a blender, and**poof - magic**out comes a professional looking Eclipse plug-in. Not only does it generate most of the functionality that you have designed, it also gives many freebies such as printing, drag-and-drop, save to image, and customization. Once you have completed the plug-in and all of its handy features, you can then distribute it to your user base for widespread use. There are even features of the Eclipse Plug-in Development Environment (PDE) for creating a distribution site that will help with the nightmare of keeping all of those clients up-to-date.
If you've done any UI programming at all, you realize just how much feature (read: bug) prone coding this eliminates. All of the MVC setup, layout management, property listeners, and the like are generated for you. The mundane, cookie cutter work is generated, which allows you to concentrate on the fun and creative part of your projects.
Tutorials that show you how to get started with GMF jump right into the wizards that are provided as part of the SDK. The wizards and dashboard that are used to develop GMF applications are very powerful. With the exception of your data model, all of the configuration files can be generated from wizards. I am all for wizards, but I tend to go by the motto "Don't generate what you don't understand." Let's take a look under the covers of the wizards, in particular,ecore,gmfgraph,gmftool, andgmfmap.
The domain model,ecore/genmodelfiles, is the starting place for development of most Eclipse-based applications. The basic development pattern for EMF is to model your domain objects and have EMF generate your entire model code base, including beans and glue code. EMF is not discussed in depth in this article, but resources are listed at the end.
The graphical and tooling definitions are straightforward. The graphical side is a list of figures, described ingmfgraphfiles, which will be used in the diagram to display classes from the domain model. Thegmftoolfile is a tooling definition that defines what text you want to display on the tool palette and the button's tool tip.
The final step is to tell GMF how all of these pieces work together by creating agmfmapfile. This is the glue that brings the other three configuration files together by telling GMF what action to take when a tool is selected, what classes are to be created, and what figures to render when those classes are added to the diagram. Once everything is wired together, generate agmfgenfile and application code, fire up a test instance of Eclipse, and test out your new application.
Now that we have talked about what GMF applications are and have a general idea of the steps involved in making them, let's take a look at a sample application that models managing a coffee shop. The beginning functionality allows you to add managers and employees, as well as associate a manager to the employees that she is responsible for. This is a fairly handy little tool, but it would be even better if we could add coffee machines to the shop. After all, this is a coffee shop and we need to make hot dirty brown water, right?
Let's fire up Eclipse to see the original plug-in and then we will add a coffee machine into the mix. Once you have added the projects to Eclipse, run the sample application (see Figure 1).
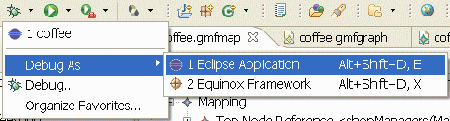
Figure 1. Running an Eclipse plug-in
Create a new coffee shop diagram by selecting File->New->Other->Examples->Coffee Diagram. This will give you a brand new diagram to play around with (Figure 2). Go ahead, add a manager or two, a few employees, and wire the managers with their employees. Once you have created a diagram, save it — in fact, keep it for later when you have wired in the coffee machines.
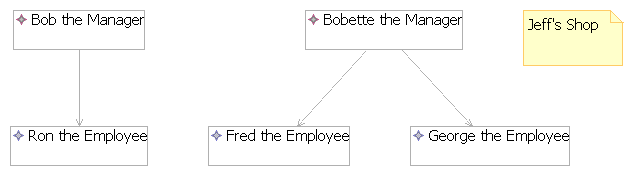
Figure 2. Sample coffee shop diagram
Now that you have the original set up and working, let's add the ability to create instances of theCoffeeMachineclass. The steps for adding a creation action will be:
- Define the figure for display
- Define the creation tool for the tool palette
- Map the creation tool, display figure, and the backing model class
Defining the Figure for Display
Let's first look at creating figures for displaying theCoffeeMachinefor your store. Open thecoffee.gmfgraphfile and poke around to see what is inside (Figure 3). There are four main types of elements in the hierarchy that you need to understand:
- Figure Gallery: Shapes for the application
- Nodes: Graphical representations of the domain model
- Diagram Labels: Labels for the Nodes that give helpful feedback to the user
- Connections: Lines denoting relationships between graphical elements
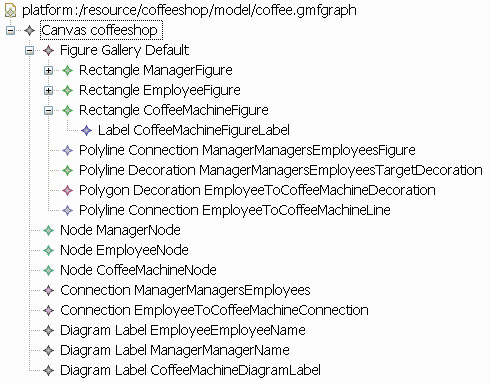
Figure 3. View of the coffee.gmfgraph file
The first step in defining the diagram is to create a figure for the editor to use. Right-click on the Figure Gallery and select New Child->Rectangle (or any other shape that suits your fancy). Select the newly createdRectangleand look at the Properties view. The one line item that must be filled in, at this point, is the Name field. Let me give you a sage word of advice when it comes to naming elements: "Make sure you name your elements so that they areeasilyidentifiable." One mistake that I made was to have vague names that looked very similar to other elements. You will be very happy in the mapping phase if you stay consistent. One naming convention that I typically use is <NameOfModelClass>Figure or <NameOfModelClass>Diagram. Pick a method that works for you, but once picked, stick with it.
For a good user experience, we would like a figure label to tell what type of model is being displayed. To add a label that shows that the rectangle is actually a coffee machine, right-click on theCoffeeMachineFigurethat you just created and select New Child»Label. In the Properties view, give the newLabela name; sticking with the naming convention, it would be something like CoffeeMachineFigureLabel. TheTextfield denotes what will be displayed on the figure label when it is drawn in the editor. Enter a phrase that would help your user know that it is a coffee machine, such as "<- Coffee Machine ->". Once again, pick a standard way of denoting figures and stick with it; this will go a long way for your users.
In order for GMF to display a model's representation in a diagram, there needs to be aNodeto map it to. Create aNodeby right-clicking theCanvasand selecting New Child->Nodes Node. This configuration is very straightforward; give it a name and select the figure you want it to use when displaying.
The next step is to make aDiagram Labelnode. This element will add text to a diagram figure for user feedback. Right-click on the Canvas and select New Child->Labels->Diagram Labels. There are two properties to complete here: Name and Figure. Sticking with our naming conventions, name the newDiagram LabelCoffeeMachineDiagramLabel. TheFigureis the element from theFigure Galleryto use for display. Select theCoffeeMachineFigureLabelfrom the drop down list.
There you have it, a finishedgmfgraphdefinition file for adding aCoffeeMachineto a diagram.
Defining the Creation Tool
You will find that when you open thecoffee.gmftoolfile, there isn't really much there (see Figure 4).
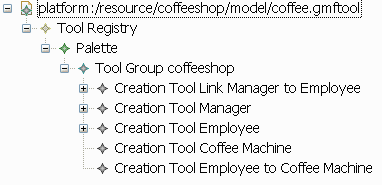
Figure 4. View of the coffee.gmftool file
There are a few types of tools and groups that you can make, but for our purposes we are interested in a creation tool. Right click theTool Groupand select New Child->Creation Tool. In the Properties view, fill in theTitleandDescription. TheTitlewill be displayed on the palette to give a hint of what the tool does. TheDescriptionis used to generate the tool tip that displays when you hover over the tool.
That is all you need to do to make a creation tool; how easy is that?!
Making the Mapping Definition
With thegmfgraphandgmftoolfinished, it is now time to define how they work together, as well as what pieces of the model are involved. The modeling for the coffee shop is done in thecoffee.gmfmapfile (Figure 5).
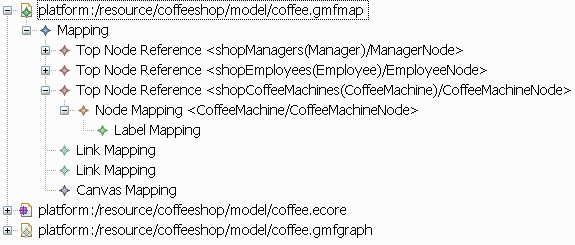
Figure 5. View of the coffee.gmfmap file
The coffee machine will be represented here by aTop Node Reference, so create one by right-clicking onMappingand selecting New Child->Top Node Reference. The only property to set on this element is theContainment Feature. From this list, select the name of the collection in which theCoffeeMachineswill be contained, in this case it is shopCoffeeMachines.
Create aNode Mappingby right-clicking the newTop Node Referenceand select New Child->Node Mapping. This node is where everything comes together; notice the three main properties:
- Element: the class (from the model) this mapping is for
- Diagram Node: the figure that should be used for displaying the model class selected in the
Elementproperty - Tool: the tool that should be used to create the model class selected in the
Elementproperty
SelectingCoffeeMachinefor theElementtells GMF that it is managing an instance of aCoffeeMachine. Looking at the drop-down for theToolselection is quite intuitive; select the tool that has the correct description for creating aCoffeeMachine. TheDiagram Nodeis right out of thegmfgraph, select theCoffeeMachineNode.
The last step is adding aLabel Mapping. This will show attributes from the model that will give more of a visual aid to the user so he will know what he is looking at. Right-click theNode Mappingand select New Child->Label Mapping. In the Properties, theDiagram LabelisCoffeeMachineDiagramLabel. Seeing a pattern yet? TheFeatureselement is a selection from a list of properties from the domain model that you want displayed.
Generating the Code
Now that the hard part is all assembled, the only thing left is to let GMF do its heavy lifting by generating the code. Right-click on thecoffee.gmfmapfile and select Create generator model, and follow the wizard. This will make the last configuration file that actually generates the editor code. Finally, we can generate the code by right-clicking thecoffee.gmfgenfile and selecting Generate diagram code. With that, you can sit back and watch it generate and compile the application's code. Now you can run the application again and start adding coffee machines to your store.
Conclusion
These are the steps that you would repeat for each model class in your diagram. There are a handful of details that you have to fill in when defining your application, but there is so much that you do not have to do when GMF does all the heavy lifting. You will find yourself copying and pasting similar nodes and changing a few properties. Once you are comfortable with the mapping files, you will find yourself flying through the development of your plug-ins.
GMF is a very powerful framework that will do most of the repetitive, error-prone work, as well as give you many advanced features. If you spend a little time looking at what the initial wizards generate, you will quickly learn about other features that we did not talk about, such as model connections, custom figures, and various decorators for the editor. The best way to learn more about GMF is playing with the configuration files and seeing what happens.
Licensing
As a quick side note, all of the Eclipse projects, including GMF, are distributed with the Common Public License (CPL) and the Eclipse Public License (EPL). When you write new plug-ins with GMF, you are free to distribute them under any license that you wish to use (as long as you are not modifying any Eclipse code). Please see the resources section for links to more information about Eclipse licensing.
Resources
- Sample code for this article:manager-employee.zipandmanager-employee-coffee.zip
- GMF home
- EMF home
- Eclipse home
- Eclipse Legal
'Eclipse' 카테고리의 다른 글
| [번역완료] Swing/SWT Integration (0) | 2007.07.20 |
|---|---|
| Eclipse on Swing (0) | 2007.06.07 |
| Using the BIRT Chart Engine in Your Plug-in (0) | 2007.05.29 |