
Published onXML.com http://www.xml.com/pub/a/2006/07/12/google-web-toolkit-ajax-java-ant-xml.html
See thisif you're having trouble printing code examples
Google Web Toolkit
ByBruce Perry
July 12, 2006
If you are a Java software and Ajax developer, chances are the Google Web Toolkit (GWT) has already grabbed your attention.
Google released this free toolkit, under anApache-style license, in May 2006. The GWT is designed for writing Ajax applications in the Java language. Google has initially made available beta versions for Windows and Linux, with a promise to add a Mac OS X version later on.
This article describes the development of a simple Ajax application on Mac OS X using GWT and familiar Java tools, such as Apache Ant, the Tomcat 5.0 servlet container, and the IntelliJ IDEA integrated development environment (the latter is a commercial IDE). The article assumes some knowledge of Java and Ant.
Using Ant with GWT
I downloaded the GWT Linux beta version, wrote my application in Java, and compiled and deployed the application on an instance of Tomcat 5.0 using an Ant build file. The Ant file runs the GWT Java-to-JavaScript compiler for me. This "compiler" is a command-line script that executes a GWT Java class, which writes the JavaScript for the application.
Using the GWT beta involves two modes of development: host mode and web mode.
Host mode is an intermediate development step that uses an embedded GWT browser; in this mode, your compiled code continues to run in a Java Virtual Machine (JVM). Host mode, however, is not available to us Mac OS X users hitching a ride on the Linux version. Host mode will be available once a Mac OS X version is released.
Web Development of a Different Flavor
This article delves into some of the typical web development related tasks GWT developers are likely to confront while creating services for Remote Procedure Calls (RPCs). RPCs are a part of a software model designed for the applications that useservice oriented architecture(SOA). These development tasks include:
- Automating the development and deployment steps with a build file (the build runs the GWT compiler, then deploys the compiler's output plus your server-side Java class files to a servlet container like Tomcat, Jetty, or Resin).
- Viewing the HTML generated by the GWT application using Firefox's DOM Inspector.
- Redesigning the widgets on the page without access to the underlying HTML (since you are using GWT's Java API).
- Making sure the HTML is legal markup, for instance, based on a particular XHTML document type required by your organization.
At Your Service
First, I'll briefly describe the service that this application creates. It is designed to illustrate the model that GWT uses.
The application displays a form in a browser, requesting that the user enter their name, age, and country of origin. When the user submits the form by clicking a button, the application displays a server response in a textarea, without initiating a page refresh. Figure 1 shows what the application looks like in the Safari browser.
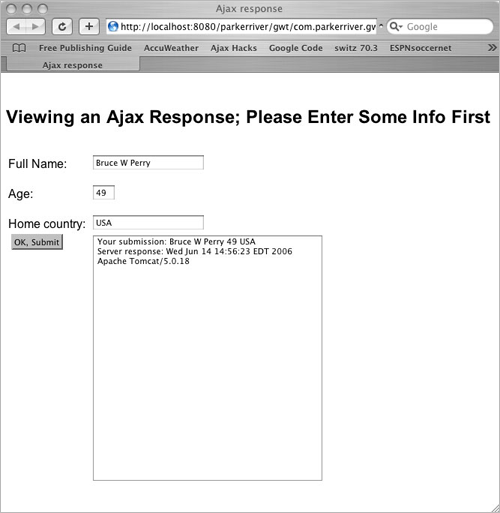
Figure 1: A simple view generated by GWT
When the user clicks theOK,Submitbutton after leaving a TextBox blank, for instance, Figure 2 shows the result.
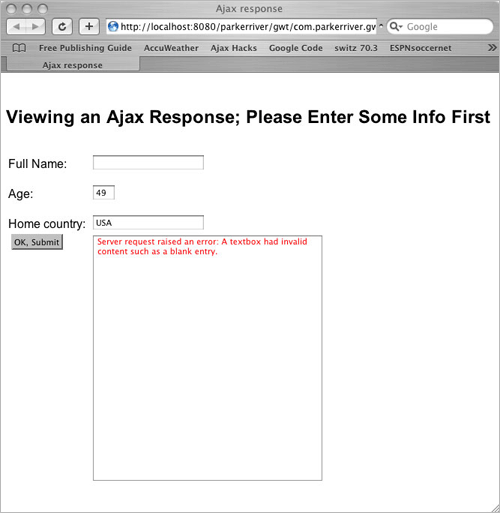
Figure 2: The application displays an error message in red
Nifty Service Mechanism
Using RPC with an Ajax application eliminates the necessity to explicitly deal withXMLHttpRequestand associated server return values, because the GWT objects handle the plumbing for you.
Each service your application defines requires two Java interfaces and one Java class. To compile these classes, you have to make sure that thegwt-user.jarlibrary is on your classpath (an Ant file entry takes care of that). The following code sample shows the Java interface that defines our service.
package com.parkerriver.gwt.testapp.client;import com.google.gwt.user.client.rpc.RemoteService;public interface ShowRespService extends RemoteService{ String displayResponse(String req);}The service interface is required to extend the GWT interfaceRemoteService. It defines a single methoddisplayResponse().
You also have to define an interface that the client, or eventual downloaded JavaScript code, will use to call this service method. The GWT uses a callback design pattern that I will describe when I show the client code (seeMyForm.java).
package com.parkerriver.gwt.testapp.client;import com.google.gwt.user.client.rpc.AsyncCallback;public interface ShowRespServiceAsync { public void displayResponse(String s, AsyncCallback callback);}The naming convention is part of making available a service with GWT; add the "Async" suffix to the end of the service interface name (ShowRespService). The purpose of theAsyncCallbackobject, which is part of the GWT API, is to handle the service response for the client. At any rate, its behavior will become clearer after you look at the code where it is used. Both of these object definitions are a part of the Java code that is used to generate the application's client-side JavaScript.
A Servlet By Any Other Name
Finally, you have to define a Java class that implements the remote service interface. This class will live on the server-side of your Ajax application.
package com.parkerriver.gwt.testapp.server;import com.parkerriver.gwt.testapp.client.ShowRespService;import com.google.gwt.user.server.rpc.RemoteServiceServlet;import java.util.Date;public class ShowRespServiceImpl extends RemoteServiceServlet implements ShowRespService { public String displayResponse(String req) { if(req.length() < 1) { throw new IllegalArgumentException( "Blank submissions from the client are invalid."); } StringBuffer buf = new StringBuffer("Your submission: "); Date date = new Date(); String serverInfo = this.getServletContext().getServerInfo(); buf.append(req); buf.append("\n"); buf.append("Server response: "); buf.append(date.toString()); buf.append("\n"); buf.append(serverInfo); return buf.toString(); }}This class must extendRemoteServiceServlet, a GWT API object that itself extendsjavax.servlet.http.HttpServlet. In other words, this class and the interface it implements has to be deployed in your servlet container.
The Steps
Now that the service is defined, let's step back for a minute to review the application's directory structure. Google Web Toolkit includes a command-line script calledapplicationCreatorthat will generate a skeletal project directory structure for you. After you have unzipped the GWT download, you can findapplicationCreatorin the top-level directory. I used the following command line to start out:
applicationCreator -out /Users/bruceperry/1gwt/secondapp/ com.parkerriver.gwt.testapp.client.MyFormFigure 3 shows what the directory looks like.
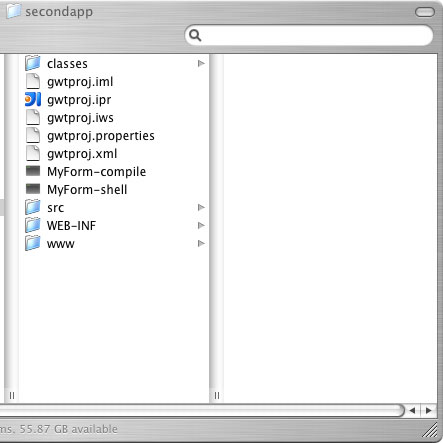
Figure 3: A GWT and IntelliJ project directory
applicationCreatorgenerates the./srcdirectory and theMyForm-compileandMyForm-shellscripts. My Ant file executesMyForm-compile; the other script launches host mode in the GWT scheme of things. The./srcdirectory includes nested directories to match your initial package name, as Figure 4 shows.
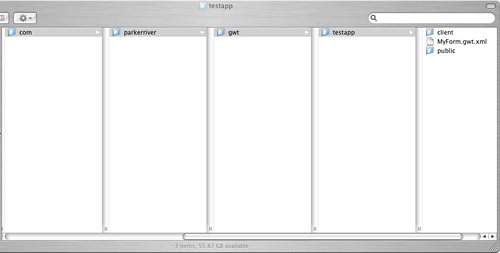
Figure 4: A Java package and module for a GWT application
TheMyForm.gwt.xmlfile is a generated configuration file that GWT calls a "module." It specifies the Java class that represents the "entry point" for your application, similar to a Java class that contains amain()method.
<module> <!-- Inherit the core Web Toolkit stuff. --> <inherits name='com.google.gwt.user.User'/> <!-- Specify the app entry point class. --> <entry-point class='com.parkerriver.gwt.testapp.client.MyForm'/></module>The other files or directories are artifacts of an IntelliJ Web application project, including./classes,./WEB-INF, and./gwtproj.ipr, so you do not have to pay special attention to them.
In addition, the./wwwdirectory does not appear (unless you create it yourself) until you run the GWT compiler that generates your application code. My project uses the Ant filegwtproj.xml, as well as the properties defined ingwtproj.properties. Before I show you the Ant build file, we'll take a look at theMyForm.javaclass that represents the entry point for the application.
Entry Point
TheMyForm.javaclass implements the GWT API interfaceEntryPoint. As a result, the class must implement theonModuleLoad()method, which the browser's JavaScript engine calls when the browser loads your Ajax application.
In other words, the GWT compiler compiles this class into JavaScript code. TheMyForm.javaclass sets up the form widgets for the browser view. The class also determines the response to the users clicking theOK, Submitbutton. The comments in the code describe exactly what's going on, so I won't repeat these comments in the article's text.
package com.parkerriver.gwt.testapp.client;import com.google.gwt.core.client.EntryPoint;import com.google.gwt.core.client.GWT;import com.google.gwt.user.client.DOM;import com.google.gwt.user.client.Window;import com.google.gwt.user.client.Element;import com.google.gwt.user.client.rpc.ServiceDefTarget;import com.google.gwt.user.client.rpc.AsyncCallback;import com.google.gwt.user.client.ui.*;import java.util.Iterator;public class MyForm implements EntryPoint { //The id pf the HTMl div element that provides //status info private String statusId = "status"; //A Grid object; actually, an HTML table private Grid grid = new Grid(5, 2); //Other user interface objects private Label nmLab = new Label(); private Label ageLab = new Label(); private Label homeLab = new Label(); private TextBox nmTxt = new TextBox(); private TextBox ageTxt = new TextBox(); private TextBox homeTxt = new TextBox(); private Button okBut = new Button(); private TextArea tarea = new TextArea(); /* This method is called when the browser loads the application. The method sets up 3 Labels and TextBoxes; as well as a Button and the TextArea that will display the server's response. */ public void onModuleLoad() { //set up labels and text fields nmLab.setText("Full Name:"); nmTxt.setMaxLength(25); ageLab.setText("Age:"); ageTxt.setVisibleLength(3); ageTxt.setMaxLength(3); homeLab.setText("Home country:"); homeTxt.setMaxLength(25); //Place these widgets within the Grid grid.setWidget(0,0,nmLab); grid.setWidget(0,1,nmTxt); grid.setWidget(1,0,ageLab); grid.setWidget(1,1,ageTxt); grid.setWidget(2,0,homeLab); grid.setWidget(2,1,homeTxt); //set up button and textarea tarea.setCharacterWidth(40); tarea.setVisibleLines(25); okBut.setText("OK, Submit"); //Give the button its behavior by adding a listener object; //literally, a ClickListener object that has an //onClick event handler. okBut.addClickListener(new ClickListener() { public void onClick(Widget sender) { //Notify the user of the remote //procedure call status; see method below showRpcStatus(true); //Create an instance of the client-side stub for our //server-side service. ShowRespServiceAsync respService = (ShowRespServiceAsync) GWT .create(ShowRespService.class); ServiceDefTarget endpoint = (ServiceDefTarget) respService; //The implementation of our service is an instance //of RemoteServiceServlet, so provide the server path //to the servlet; this path appears in web.xml endpoint.setServiceEntryPoint("/parkerriver/s/showresp"); //This interface handles the response from the server. //It will display the server's response in a TextArea. //The display will be in a red color if the message //represents an error. AsyncCallback callback = new AsyncCallback() { public void onSuccess(Object result) { //If there is one, remove the 'warning' CSS style //relating to any error text's appearance if(tarea.getStyleName(). equalsIgnoreCase("warning")){ tarea.removeStyleName("warning"); } //Textarea displays the server's return value tarea.setText((String)result); } public void onFailure(Throwable caught) { //Textarea displays any exception messages tarea.setStyleName("warning"); tarea.setText( "Server request raised an error; Java exception : "+ caught == null ? "An unknown exception" : caught.getMessage()); } }; //Call the service method, validating the form //values first. try{ respService.displayResponse( getPanelTextContent(grid,true), callback); } catch (Exception e) { tarea.setStyleName("warning"); tarea.setText("Server request raised an error: "+ e.getMessage()); } finally { //Remove the status message when we are finished //making the RPC call showRpcStatus(false); } } }); //Now add these widgets to the grid grid.setWidget(3,0,okBut); grid.setWidget(3,1,tarea); //set the vertical alignment for the OK button's cell grid.getCellFormatter().setVerticalAlignment(3,0, HasVerticalAlignment.ALIGN_TOP); //set the vertical alignment for the TextBoxes, //in order to line them up properly grid.getCellFormatter().setVerticalAlignment(0,1, HasVerticalAlignment.ALIGN_BOTTOM); grid.getCellFormatter().setVerticalAlignment(1,1, HasVerticalAlignment.ALIGN_BOTTOM); grid.getCellFormatter().setVerticalAlignment(2,1, HasVerticalAlignment.ALIGN_BOTTOM); //Add the grid, actually an HTML table, to a div element //in the browser's HTML with id value "gridholder" RootPanel.get("gridholder").add(grid); } /*Initiate a simple check for blank fields, then return the submitted values as a single string. HasWidgets is an interface that Grid and other panel type objects implement. Therefore, we can pass the grid into this method; iterate over its contained TextBoxes, and validate the TextBox's content. */ private String getPanelTextContent(HasWidgets panelType, boolean validateContent) { StringBuffer buf = new StringBuffer(""); String tmp = null; if(panelType != null) { //for the sake of brevity, clipped... } //return the TextBoxes content each //separated by a space return buf.toString(); } /* Overly simplified validation! */ private boolean validateText(String _content){ return _content.length() > 0; } private int getTextboxCount(HasWidgets pType){ //Not shown: returns the number of TextBox widgets //in the panel } /* Show the user a status message if the response takes long to arrive.*/ private void showRpcStatus(boolean _on){ //Use the GWT DOM API for JavaScript DOM //programming Element el = DOM.getElementById(statusId); if(el != null) { if(_on) { DOM.setStyleAttribute(el,"font-size","1.2em"); DOM.setStyleAttribute(el,"color","green"); DOM.setInnerHTML(el, "Fetching server info..."); } else{ DOM.setInnerHTML(el, ""); } } }}Most of this code deals with the GWT API. It is interesting to note that if you have to implement JavaScript DOM programming, as in the showRpcStatus() method, you can accomplish this task in Java by using thecom.google.gwt.user.client.DOMclass.
Build File
Below are the highlights of the Ant build file; it:
- Compiles the Java files into the project directory's./classesdirectory.
- Executes the GWT compile script (in this case called
MyForm-compile). - Moves the resulting code generated in the./wwwdirectory to a larger web application already deployed on Tomcat.
- Copies the compiled Java servlet and associated interface (ShowRespService) to that same web application.
The two Ant targets that compile the Java classes and initiate the conversion to JavaScript are designed to make the overall build fail if these tasks raise any errors.
Ant XML
Here's what thegwtpoj.propertiesfile contains, among other values:
web.deploy.location=/users/bruceperry/parkerriver/gwtweb.classes.location=/users/bruceperry/parkerriver/WEB-INF/classes
The following XML represents just the highlights from the Ant file; the entire file is linked in theresourcessection of this article.
<?xml version="1.0" encoding="UTF-8"?><project name="gwtproj" default="all"> <property file="gwtproj.properties"/> <!-- The top-level directory for the project and where the ant file resides --> <dirname property="module.gwtproj.basedir" file="${ant.file}"/> <!-- The ./classes directory inside the top-level directory --> <property name="gwtproj.output.dir" value= "${module.gwtproj.basedir}/classes"/> <!-- This target calls MyForm-compile to create all the content in the ./www directory --> <target name="gwt-compile" depends= "compile.production.classes" description="use gwt's compiler"> <delete> <fileset dir="${web.deploy.location}" includes="**/*"/> </delete> <exec executable= "${module.gwtproj.basedir}/MyForm-compile" failonerror="true"/> <copy todir="${web.deploy.location}"> <fileset dir= "${module.gwtproj.basedir}/www"> </fileset> </copy> </target> <target name="compile.production.classes" description= "Compile the gwtproj production classes"> <mkdir dir="${gwtproj.output.dir}"/> <javac destdir="${gwtproj.output.dir}" debug= "on" failonerror="true" nowarn= "off" memoryMaximumSize="128m" fork= "true" executable="${module.jdk.home.gwtproj}/bin/javac"> <classpath refid="gwtproj.module.classpath"/> <src refid="gwtproj.module.sourcepath"/> </javac> </target> <!-- copy the Java servlet classes to the web application --> <target name="deploy.classes" depends="gwt-compile" description="copy classes to web directory"> <copy todir="${web.classes.location}"> <fileset dir="${gwtproj.output.dir}"> </fileset> </copy> </target> <target name="all" depends="deploy.classes" description="build all"/></project>You can run this Ant file from within the IDE (as in IntelliJ) or by using this command line in the directory that contains the build file:
ant -buildfile gwtproj.xmlFor the most part, after making application changes and running Ant, you can see the changes in the browser by reloading the browser page.
Final Set-Up
The last set-up aspect you may have to know about is adding thegwt-user.jarlibrary to the/WEB-INF/libdirectory of your web application.
I created my own JAR file minus the javax package, named itgwt-user-deploy.jar, and added it to/WEB-INF/lib. This is because Tomcat will not load an individual web application's library if it contains the servlet API classes.
Web Developer's Hard Knocks
applicationCreatoralso creates the HTML front end of your Ajax application, in this case calledMyForm.html.
What if your application HTML has to meet a standard such asXHTML transitionalor strict? In terms of XHTML transitional, I first added the required DOCTYPE to the top ofMyForm.html, as well as thehtmltag's associated attributes:
<!DOCTYPE html PUBLIC "-//W3C//DTD XHTML 1.0 Transitional//EN" "http://www.w3.org/TR/2000/REC-xhtml1-20000126/DTD/xhtml1-transitional.dtd"><html xmlns="http://www.w3.org/1999/xhtml" xml:lang="en" lang="en">I then uploadedMyForm.htmlto the World Wide Web Consortium's HTML validator athttp://validator.w3.org/.
After running the validator, I made a few simple changes to the HTML, such as properly closing themetatags and adding a:type="text/javascript"to thescripttag.
Strict: Tsk, Tsk
However, if you want to meet the XHTML Strict standard, then a few more complex changes may be required. For example, the W3C's validator flagged as an "undefined element" theiframetag that is required for GWT's history support (providing the same functionality as a browser back button). XHTML Strict has removed theiframeelement.
This may not represent a problem for you (and may be solved by the GWT's future releases, as well as any other apparent issues); however, you can implement alternate strategies such as extending the GWT's classes and creating your own compliant widgets.
Shimming Widgets Into Place
An issue that always arises in web development involves the visual design of the application. The project's designer wants the page to look exactly like their creation in Adobe Illustrator, right?
Although you may not be able to achieve this eye-candy utopia while working on a complex Ajax project, you can use Firefox's DOM Inspector to at least view the HTML that your Java classes ultimately generate. Then work from there.
Go to Firefox's Tools=>DOM Inspector menu item (see Figure 5.)
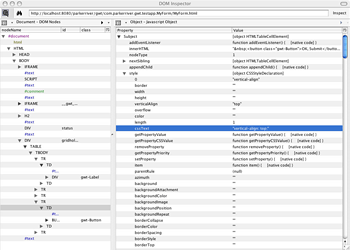
Figure 5: DOM Inspector provides a behind-the-scenes glimpse (Click image for full-size screen shot)
This shows that thecom.google.gwt.user.client.ui.Gridobject you are working with in the Java code is implemented as an HTMLtabletag. TheTDtag in this table that contains theOK, Submitbutton is associated with astyleattribute that has the value "verticle-align:top."
This lines the button up with the top of the textarea. Here is the associated Java code in theMyForm.javaclass that initiated the correct alignment:
//set the vertical alignment for the OK button's cell grid.getCellFormatter().setVerticalAlignment(3,0, HasVerticalAlignment.ALIGN_TOP);Without this call in the code, the button floated amateurishly down around the textarea's mid-section.
Now to get only that button to align flush left with the labels above it.
Resources
- Google Web Toolkit:http://code.google.com/webtoolkit/
- This article's code:gwtarticle_jul06.zip
XML.comCopyright © 1998-2006 O'Reilly Media, Inc.
'Web Programming' 카테고리의 다른 글
| Using Google Web Toolkit (0) | 2007.05.31 |
|---|---|
| Ajax 마스터하기 (0) | 2006.09.07 |
| Ajax와 Java EE의 통합 (한글) (0) | 2006.09.07 |