
Published onONJava.com(http://www.onjava.com/)
http://www.onjava.com/pub/a/onjava/2006/08/23/eclipse-rich-client-platform.html
See thisif you're having trouble printing code examples
Eclipse RCP: A Platform for Building Platforms
byWayne Beaton08/23/2006
Technology has a definite cycle. After a decade of dominance by thin clients, rich-client technology is making a comeback. Numerous organizations are building their applications as rich clients and many of them are basing their applications on theEclipse Rich Client Platform(RCP). The term "rich client" implies first that the application provides the user with arichexperience; second, it implies that the application is a client for some server. While it is not necessarily the case that a rich client has a corresponding server component, this is often the case.
Rich clients are in many ways comparable to fat clients. Both provide the user with a native desktop experience, presenting information and functionality for the user that is difficult, undesirable, or impossible to deliver using thin-client technology. However, rich clients provide so much more. Where fat clients tend to be large monolithic applications that are difficult to deploy and update, rich clients are lighter weight and based on a component model that makes them relatively easy to deploy and update. Historically, fat clients have been built to be platform specific; today's rich-client technologies expose the power of the underlying platform, but hide away the details of that platform, allowing the developer to focus on the task rather than idiosyncratic details of any particular platform.
Rich clients also tend to be more scalable than fat clients. Traditionally, fat clients connect directly to a database. This limits the environments where fat clients can run (firewalls may restrict connections from the fat client to the database) and the scalability of the application (the total number of connections from the clients to the server) may be limited by the database. Rich clients tend to leverage application servers that are responsible for making connections to the database. This sort of configuration is very flexible (firewall friendly) and is highly scalable. Of course, there is nothing in the technology that necessarily limits fat clients from communicating with an application server, it's just that in the heyday of fat-client technology, application servers didn't exist like they do now.
There are no rules that state that a rich-client application must be a client for some corresponding server. Many organizations leveraging rich-client technology are building robust, extendable, updatable, localized, standalone applications. Similarly, while rich clients tend to leverage application servers, there is no rule or technology limitation that forces this to be true. There is no reason why a rich-client application cannot access a database directly.
Rich-client technology represents a marriage of the strengths of fat-client and thin-client technology: rich user experience, highly scalable, platform-independent, and fairly easy to deploy and update.
The Eclipse RCP is the functionality that lies at the core of the Eclipse platform. When most people think of Eclipse, they think of the Java Integrated Development Environment (IDE). If you strip away the parts of Eclipse that make it an IDE, you're left with a core that provides the fundamental workbench functionality, including support for movable and stackable window components (editors and views), menus, tool bars, push buttons, tables, trees, and much more. This core functionality is Eclipse RCP.
Eclipse RCP offers the application developer:
- A consistent and native look and feel for applications and features
- Common application services such as window management, update management, help, and selection management
- A native look and feel, leveraging real platform widgets on Windows, Mac OS X, Linux, Solaris, HP-UX, AIX, and embedded devices
- A standardized component model
- Pervasive extensibility
- Integrated update mechanism
- First-class development tools (the Eclipse Software Development Kit (SDK) is a world-class software development environment)
Although it is actually an inappropriate use of the term, Eclipse RCP can be considered middleware for building rich-client applications. It provides the infrastructure that your application needs, which allows developers to focus on core application functionality not the plumbing. Don't reinvent the wheel: use Eclipse RCP.
Components
The Eclipse RCP is composed of numerous components, and each component contributes to some part of the overall functionality of the environment. In fact, almost all of the Eclipse RCP is made of components; every part of RCP, with the exception of a small amount of bootstrap code is a component. Components are more commonly known as plug-ins in Eclipse circles (or bundles in OSGi terminology). The term "plug-in" implies that the functionality contained within the component is somehow second class, or an add-on to built-in functionality. This is not the case; Eclipse RCP treats all plug-ins as equals and there is no explicit notion of built-in versus custom. The plug-ins that you create to contribute your application's behavior are run alongside those that make up Eclipse RCP.
A natural way to start the development of a rich-client application is to begin with a single plug-in. Within a single plug-in, you can define the entire user interface, business logic, and object model for your application. Creating a new Eclipse Rich Client Platform application is as easy as selecting menu item File>New>Project..., choosing to create a new Plug-in Project, and following steps presented by the resulting wizard. On the Content page of the wizard, be sure to answer "Yes" to the question, "Would you like to create a rich client application?" The Templates page of the wizard is shown in Figure 1; here we choose to create an RCP application with a view.
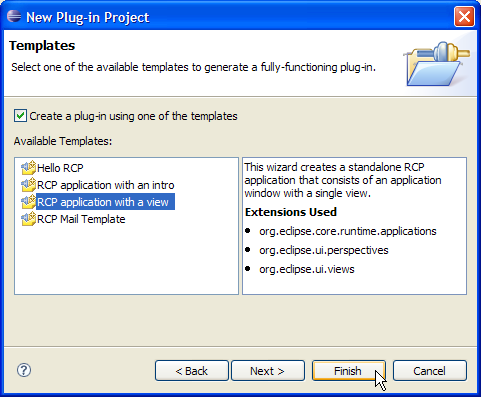
Figure 1. The Templates page from the New Plug-in Project wizard
This will create a new plug-in that contains the parts necessary for an RCP application including configuration of the workbench (menu bar and tool bar) and a single view containing a table (see Figure 2).
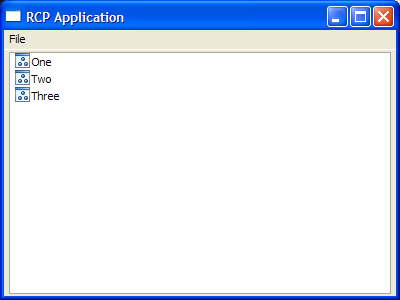
Figure 2. The wizard creates a fully functional RCP application
The wizard generates the following classes:
- Application.java
- The generated
Applicationclass contains a single method,run(Object args)that is responsible for running the application (oddly enough). This method bootstraps and opens the workbench window. When this method exits, the application shuts down. - ApplicationActionBarAdvisor.java
- The
ApplicationActionBarAdvisorclass is responsible for building the menu bar, tool bar, and status line. The generated class creates a menu bar with a single File menu with an Exit item. You can add thefillCoolBar(ICoolBarManager coolBar)method to add a toolbar to your workbench window. Similarly, you can add thefillStatusLine(IStatusLineManager statusLine)method to add a status line to the workbench window - ApplicationWorkbenchAdvisor.java
- The
ApplicationWorkbenchAdvisorclass provides numerous hooks into the application life cycle. You can, for example, add methods that are invoked when the application is started or shutdown. The generated implementation doesn't do very much other than specify the initial perspective presented to the user. - ApplicationWorkbenchWindowAdvisor.java
- Like the
ApplicationWorkbenchAdvisor, theApplicationWorkbenchWindowAdvisorclass provides hooks into the workbench life cycle. You can add methods that are invoked when a workbench window is created, opened, restored, or closed. The generated implementation provides apreWindowOpen()method that sets the initial size and title of the window, as well as the visibility of the tool bar and status line (both arenotvisible). - Perspective.java
- The Eclipse SDK provides numerous perspectives. The generated application includes one; you can specify additional perspectives as required. The generated perspective hides the editor area (i.e., no editors will be visible in the perspective) and adds the view generated by the wizard. The perspective is set to be fixed: its views are rendered without the familiar title bars and cannot be moved. By changing the setting from
falsetotrue(and adding a few more views to your application) the user can customize the position of the views to his heart's content. - View.java
- The generated
Viewclass contains a table with a handful of hardcoded entries. This is where you can render the appearance of your application. If a table is what you need, you can customize the one provided by hooking it up to your object model, or you can completely replace the table with the widget or widgets.
The next step is to modify the generated code by either changing or adding menus, menu items, tool bars, views, and editors as required.
Evolution
Building an application in this manner provides exposes the developer to a lot of useful infrastructure. More than just a collection of windowing components, the RCP application provides the framework for managing your application's user interface, including higher level notions of editors and views (with the ability to reposition and stack), tool bars, menus, selection management, and must more. However, building an application in this manner only scratches the surface of the power that Eclipse enables. This is a fine first foray into Eclipse application building; the natural next step is to start building real components.
Plug-ins are a powerful feature of the Eclipse platform. In fact, the Eclipse SDK is itself a collection of plug-ins; there is very little in Eclipse that is not a plug-in (just a relatively small amount of bootstrap code). This makes Eclipse very extensible. New functionality can be added to the SDK by creating one or more plug-ins that are dynamically discovered and installed by the framework. Plug-ins are discovered by virtue of being present; there is no manifest that needs to be updated when you add a plug-in.
Like the Eclipse SDK, RCP applications are an assembly of plug-ins. Plug-ins come in many different shapes and sizes. As demonstrated above, you can build an entire Eclipse RCP application using a single plug-in added to the collection of plug-ins that implement RCP itself. Or you can build an RCP application as a collection of many plug-ins that each implement some piece of the application.
There are many benefits to building your RCP application as a collection of many plug-ins, including:
- Lazy-loading
- Eclipse will load a plug-in when it is required. If you partition your application into multiple plug-ins you can decrease your application's startup time and improve its use of memory by leveraging this feature. At startup time, only the initially required subset of the plug-ins will load rather than your entire application; this will reduce the amount of time and memory required at startup.
- Updates
- Eclipse can update individual plug-ins when an update is required. If your application is partitioned into multiple plug-ins, only those plug-ins that actually require updating can be downloaded and installed. This will decrease the amount of time and resources required to update your application.
- Extensibility
- The very act of partitioning an application into multiple plug-ins encourages the creation of extension points, which can later be leveraged in ways that you may not currently be considering.
- Reuse
- By making your application a collection of components, you provide an opportunity to reuse those components in other applications without needing to make code changes.
- Better design
- Making multiple components encourages better design. When you partition your application, you're forced to think about important issues like how you will define interfaces between the components and how you're going to facilitate conversation between them. Unfortunately, there's no guarantee that you'll end up with a great design, but it's certainly encouraged.
An obvious way to partition your application is to separate your domain-specific business logic and object models into one plug-in and your user interface into another. By doing so, you are effectively layering your application along the lines recommended by the model-view-controller pattern. That is, your application's business logic--contained within its own plug-in--is unconcerned with the specifics of the user interface (ideally, it is void of any notion of any particular user interface technology or language). A second plug-in provides the user interface code (view and controller layers) and is void of any implementation of business logic. The user interface plug-in has the business logic plug-in as a dependency and makes use of the models defined in it. This style of architecture is very similar to what you might find in a Java EE application: a web module (WAR file) contains servlets as controllers and JSPs as views; other JAR files contain the business logic and object model.
The Eclipse component model provides a great service in this style of architecture. By imposing a visibility model, Eclipse actively discourages the developer from including user interface code in the model (of course, real programmers can figure out ways around this). The collection of user interface plug-ins all have the business logic plug-in (and others) as dependencies: the views can see the model, but not the other way around. By encouraging this style of separation, the level of coupling in the code is reduced which makes the code far less brittle in the face of change and infinitely more reusable.
Assembly of Components
When your application code is partitioned into multiple plug-ins, creating an RCP application is a process of assembling those plug-ins into a coherent whole. Defining the set of plug-ins required by application is one of the roles of a product configuration. A product configuration is also the place where branding information, including the location of the splash screen, window icons, about image and text, and more.
Assembling an application from a collection of plug-ins is a straightforward process. In fact, the biggest challenge in the process is the artistic processes around branding the application: as part of the branding process, you can add a splash screen, window icons, launcher icons, and an about graphic. You create a product configuration for your application by selecting menu entry File>New>Product Configuration. The wizard is shown in Figure 3.
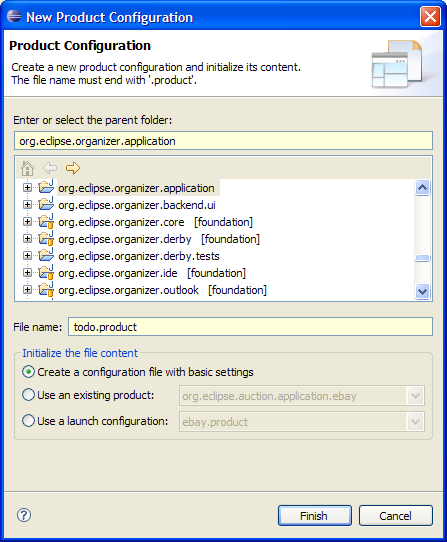
Figure 3. The "New Product Configuration" wizard
As part of creating a new product configuration, you need to specify a parent plug-in project. Typically, this is the plug-in that defines the application. There are three different ways to create the initial configuration:
- Create a configuration file with basic settings. With this option, an empty configuration is created that you must completely configure yourself.
- Use an existing product. With this option, you create a new configuration based on the values in an existing product configuration.
- Use a launch configuration. With this option, the initial configuration is based on the set of plug-ins referenced in an existing launch configuration. You would use this option if you had previously run your application using the Run As>Eclipse Application menu option.
You can create multiple product configurations. You might do this if, for example, it makes sense to include additional optional plug-ins that enhance the functionality of a base application. The second option in the wizard is intended to facilitate the creation of multiple similar configurations.
On the Configuration tab of the product configuration editor (see Figure 4), you're invited to specify the names of the plug-ins that your application requires.
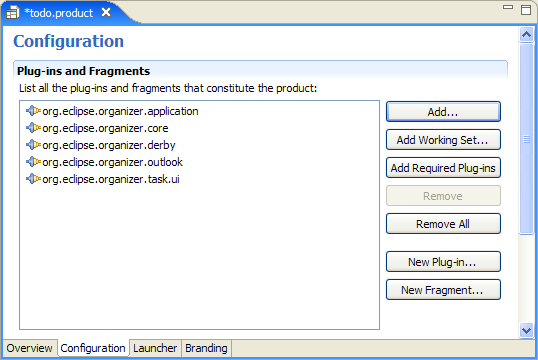
Figure 4. The Configuration page of the product configuration editor
The list of plug-ins needs to include the application plug-in along with all of the other plug-ins that your application requires. The editor does help you sort out what plug-ins you'll need. After you've added your application's plug-ins to the list, click the button labeled Add Required Plug-ins; this will add all the plug-ins that are referenced by your plug-ins, the plug-ins required by those plug-ins and so on. This set will include many plug-ins from the Eclipse platform itself. When you use this button, you only need to include your top-level plug-ins and the editor will do the rest by finding and adding the plug-ins that those top-level plug-ins depend on. It is also possible to configure a product using features; in fact, you need to use features to use the update mechanism.
The Launcher is concerned with the executable that starts your application. On this page, you can specify an icon and name to display in the file browser. The Branding page is concerned with (oddly enough) branding the application. This includes identification of a splash screen, location of optional start up progress bar, window icons, and an about dialog. The information that you specify on these pages is used when you export the project.
When the application is exported, all the plug-ins listed on the Configuration page are built (if necessary) and copied, along with the branding information, and essential Eclipse configuration to a directory on your file system. This directory, combined with a Java Virtual Machine (JVM), is all you need to run your application.
You don't have to export your application to run it; you can run it directly from within the workbench. This is a great way to test your configuration and use the debugger to identify and solve problems. There are two options on the Overview page of the product configuration editor that can be used to run your application. These options, presented as hyperlinks labeled "Launch the product" and "Launch the product in Debug mode" create and run launch configuration either in run or debug mode.
Building Platforms
Thus far, this discussion has been focused on an application composed of some very well-defined sets of plug-ins. One of the greater strengths of Eclipse is its ability to dynamically discover and load components. This grants the developer considerable power to build very extensible applications. Taken to the extreme, you can build your RCP applications as foundations with your own open API.
In the bookContributing to Eclipse: Principles, Patterns, and Plug-Ins, the authors discuss several rules concerned with extensibility. First, the Invitation Rule states, "Whenever possible, let others contribute to your contributions." To let others contribute, you can define your own set of extension points that permit other developers to augment your application with their own behavior. The Eclipse workbench makes heavy use of this mechanism to let developers add their own views, editors, entries to menus, and more.
Consider an RCP application that manages a to do list. The core functionality of this application provides an object representation of a to do task and the ability visualize a list of tasks. The visual representation of the list is shown in Figure 5.
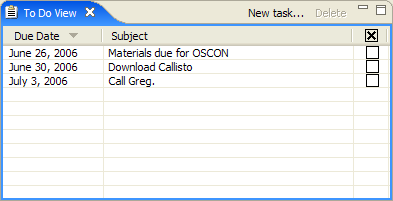
Figure 5. The To Do View
By itself, this application is moderately interesting. But by opening up the application to extension, significant power is granted to a broader community. It would be relatively easy to build this application with a hardcoded mechanism for storing the task information. But rather than hardcoding, you might consider opening the application to allow other developers to hook their own storage mechanism into your code through an extension point. Your initial implementation can leverage the extension point to provide the ability to store information in a local database. Another developer might extend your application to store information on a remote server using a web service or some other mechanism.
Consider also how your application interacts with the desktop. It is relatively easy to provide drag-and-drop support for an application. But drag from where? In your initial implementation, you might provide the ability to drag text from a browser into your application. If you build extension points into your application, you can grant other developers the ability to extend your application to drag information from other applications such as Microsoft Outlook or Mozilla Thunderbird.
By creating an extension point, you grant yourself and other developers the ability to extend your application without changing it. Using extension points that dynamically discover the available extension makes your application totally customizable. It may not, for example, make sense to include the ability to drag and drop from Outlook in the version of your application you package for Linux; for that configuration, you can simply just not include the plug-in that provides support for Outlook.
Of course, making effective use of the extension point mechanism takes practice.
Conclusion
Eclipse RCP is a powerful framework for building rich-client applications and more. An initial look at RCP reveals tight integration into the host platform with a native look and feel, window management, customizability featuring stackable editors and views, and more. But this only scratches the surface. At the heart of RCP lies an OSGi-compliant component model that opens a world of power and flexibility. Components are dynamically discovered and loaded as required; they can be updated and extended.
An evolutionary approach to adopting Eclipse RCP is natural. Your initial foray into Eclipse RCP will likely be focus on the user interface aspects. As you become more familiar with the component model, the partitioning of application code into multiple plug-ins follows. Ultimately, with the development of domain-specific platforms based on multiple extensible plug-ins, the real power of Eclipse RCP is unlocked.
Resources
- Eclipse RCPon the Eclipsepedia Wiki
- Using Perspectives in the Eclipse UI
- Eclipse Workbench: Using the Selection Service
- Contributing to Eclipse: Principles, Patterns, and Plug-Ins
Wayne Beatonis employed by The Eclipse Foundation where he works as an evangelist, spreading the word and helping folks adopt Eclipse technologies.
Return toONJava.com.
Copyright © 2006 O'Reilly Media, Inc.
'Eclipse' 카테고리의 다른 글
| Profiling Your Applications with Eclipse Callisto (0) | 2006.08.30 |
|---|---|
| Integrating Swing into Eclipse RCPs (0) | 2006.06.18 |
| Eclipse - a tale of two VMs (and many classloaders) (0) | 2006.06.18 |